Most guidance on buying custom flashlights fixates on the beam, but if you are ordering a few hundred lights with your name on them, the questions that actually decide whether people keep and use the thing are about the body and the branding: what the housing is made of, how it is finished, and how your logo is applied. A crisp four-color logo on the wrong finish rubs off in a glovebox within months, while a well-chosen mark on the right aluminum outlives the batteries several times over. Here is how those choices fit together.
The body decides everything else
Two housing families cover almost all custom lights. Budget promotional pieces are usually molded from ABS or other plastics, which are cheap, light, and easy to print in any color, but they cannot be laser engraved because the heat damages the surface. Everything above entry level is machined or extruded aluminum, most commonly the 6061-T6 alloy that the anodizing trade treats as the default because it accepts dye cleanly and finishes uniformly. Aluminum is then almost always anodized, an electrochemical process that grows a hard oxide layer into the surface rather than coating on top of it, which is why a good anodized finish does not chip like paint. The finish you choose sets the color, the toughness, and, crucially, which decoration methods are even available, so it is the first decision, not the last.
Laser engraving: permanent, but one color
Laser engraving is the most durable way to mark metal because it removes material instead of adding ink. On an anodized body, the beam ablates the colored oxide layer and exposes the lighter aluminum beneath, so on a black light your logo reads as a bright silver mark with strong natural contrast. That permanence is the selling point: an engraved logo will not scratch, fade, or wash off for the life of the light, which makes it the right call for premium gifts and anything that lives on a keychain or in a toolbox. The tradeoffs are real, though. Engraving is monochrome by nature, so you cannot reproduce a multi-color brand mark, and the finished color is whatever the base metal gives you rather than your Pantone. It also works only on metal, ruling out plastic bodies entirely. When your identity is a single wordmark or a clean logo and you want it to last, engraving is hard to beat.
Pad and screen printing: color on a curved body
When you need brand color, you need ink. Pad printing uses a soft silicone pad to pick up the image from an etched plate and stamp it onto the curved barrel of the light, which is why it handles three-dimensional shapes that flat processes cannot. Each color is a separate stamp, with roughly one to four colors practical before cost and registration become awkward, and it is the most economical imprint for short and medium runs. Cylindrical screen printing rolls the body against a screen to lay down a durable single-color image and suits larger volumes. Both are ink-on-surface methods, so they can be Pantone-matched to your exact brand color, and both are the only realistic way to decorate a plastic body. The catch is durability: ink sits on top of the finish and will wear with heavy handling over time, where an engraving would not. For color-critical branding, giveaways in brand colors, or plastic housings, printing is the answer; just specify a protective clear coat if the lights will see rough use.
How hard the finish needs to be
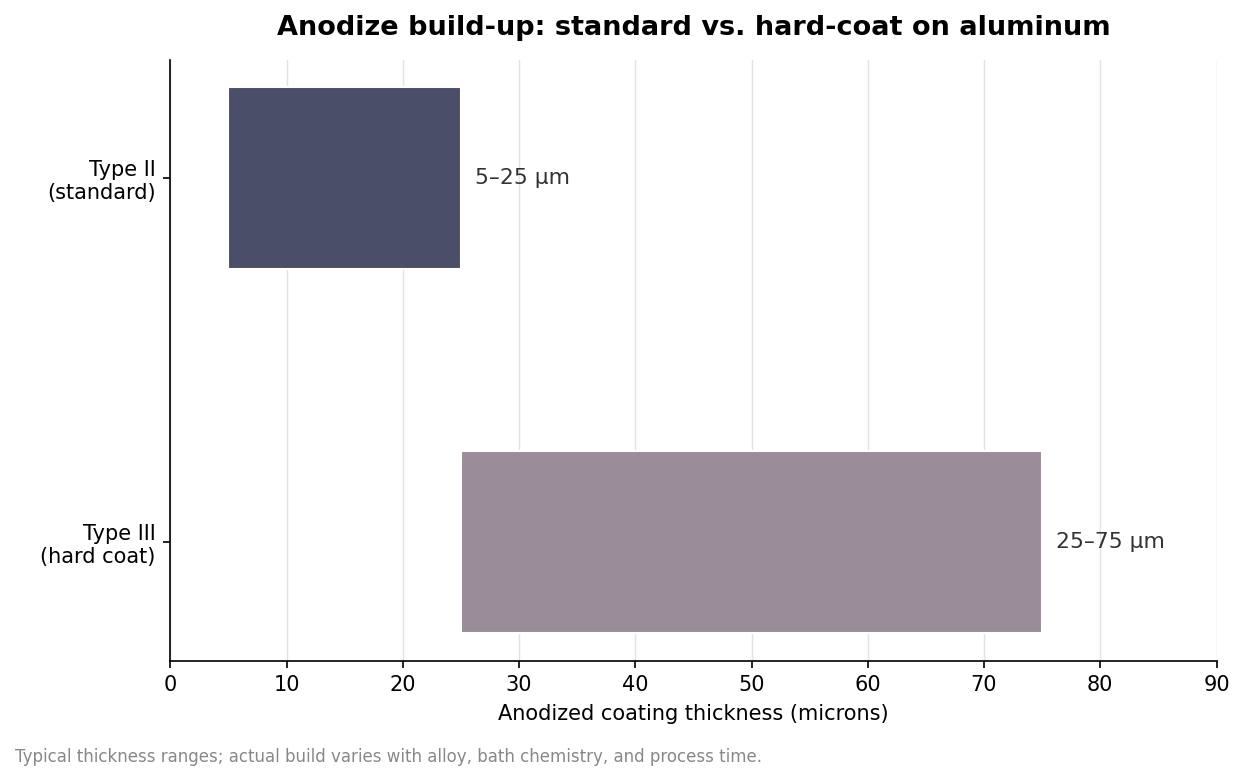
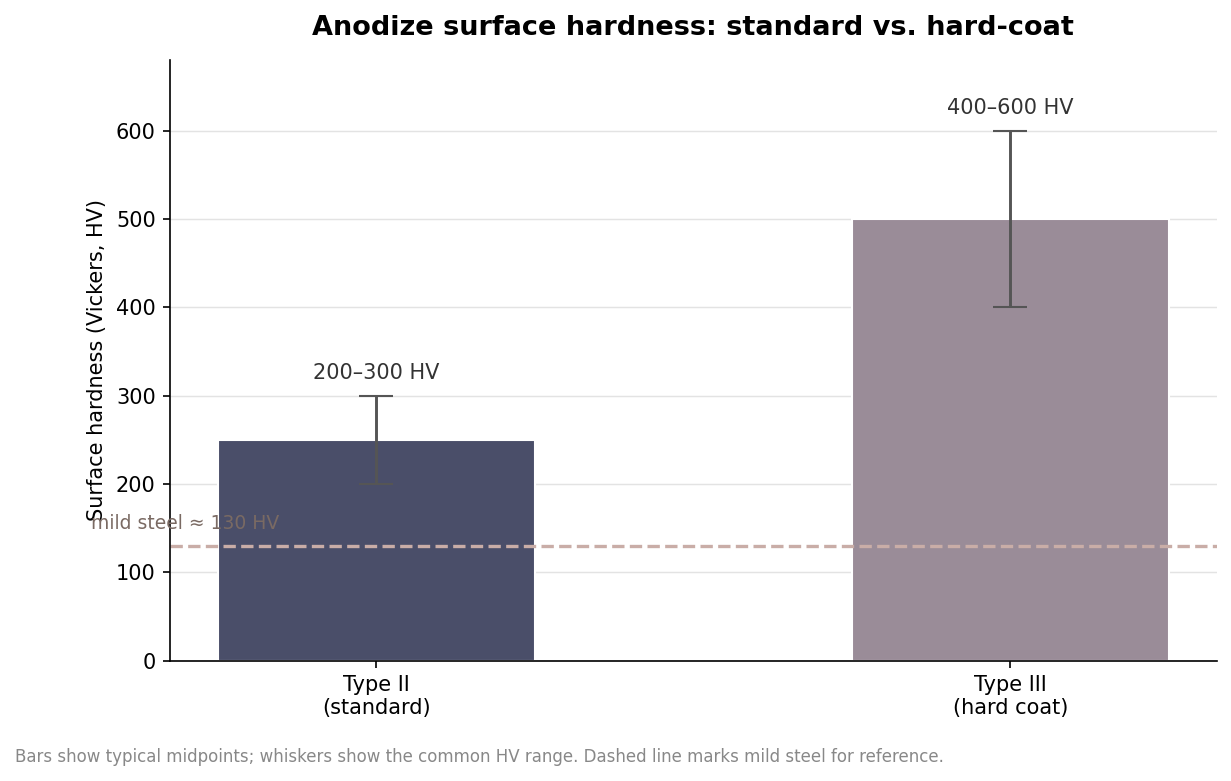
Anodizing comes in two grades that matter here. Type II, the standard, builds a coating roughly 5 to 25 microns thick with a surface hardness around 200 to 300 on the Vickers scale, and it accepts the full color spectrum, from red and blue to gold and black. Type III, or hard-coat anodize, grows a much thicker 25-to-75-micron layer that reaches 400 to 600 Vickers, several times harder than mild steel, and shrugs off abrasion and salt exposure far longer, with salt-spray resistance jumping from a few hundred hours to well over two thousand. That toughness costs two to three times as much to apply, and its dense structure only takes dark dyes, so hard-coat bodies come in bronze, gray, and black rather than bright colors. For a light that lives in a drawer, standard Type II in your brand color is plenty; for tactical, marine, or field-service lights that get dropped and scraped, hard-coat earns its premium.
Putting the combination together
The choices stack into a few clean recipes. For a premium corporate gift, specify a 6061 aluminum body in a Type II color that matches your brand, then laser engrave a single-color logo for a mark that will still look sharp years later. For a rugged or tactical light, choose black hard-coat anodize and engrave, since the finish and the decoration are both built to survive abuse. For a high-volume giveaway where budget rules, an anodized aluminum or ABS body with a one-color pad print in your exact brand color keeps the per-unit cost down while still carrying the logo. Whatever you pick, confirm the practical details before you approve a sample: the usable imprint area on a narrow barrel is small, so a compact horizontal logo reads better than a tall stacked one; check that any water rating such as IPX4 for splashes or IPX7 for brief submersion matches how the light will be used; and expect custom decoration to start in the low hundreds of units. Treat the figures here as indicative ranges and let a physical sample in your own hands settle the final call.