Category: Uncategorized

  • How to Brand a Custom Flashlight: Decoration Methods and Body Materials

    How to Brand a Custom Flashlight: Decoration Methods and Body Materials

    Most guidance on buying custom flashlights fixates on the beam, but if you are ordering a few hundred lights with your name on them, the questions that actually decide whether people keep and use the thing are about the body and the branding: what the housing is made of, how it is finished, and how your logo is applied. A crisp four-color logo on the wrong finish rubs off in a glovebox within months, while a well-chosen mark on the right aluminum outlives the batteries several times over. Here is how those choices fit together.

    The body decides everything else

    Two housing families cover almost all custom lights. Budget promotional pieces are usually molded from ABS or other plastics, which are cheap, light, and easy to print in any color, but they cannot be laser engraved because the heat damages the surface. Everything above entry level is machined or extruded aluminum, most commonly the 6061-T6 alloy that the anodizing trade treats as the default because it accepts dye cleanly and finishes uniformly. Aluminum is then almost always anodized, an electrochemical process that grows a hard oxide layer into the surface rather than coating on top of it, which is why a good anodized finish does not chip like paint. The finish you choose sets the color, the toughness, and, crucially, which decoration methods are even available, so it is the first decision, not the last.
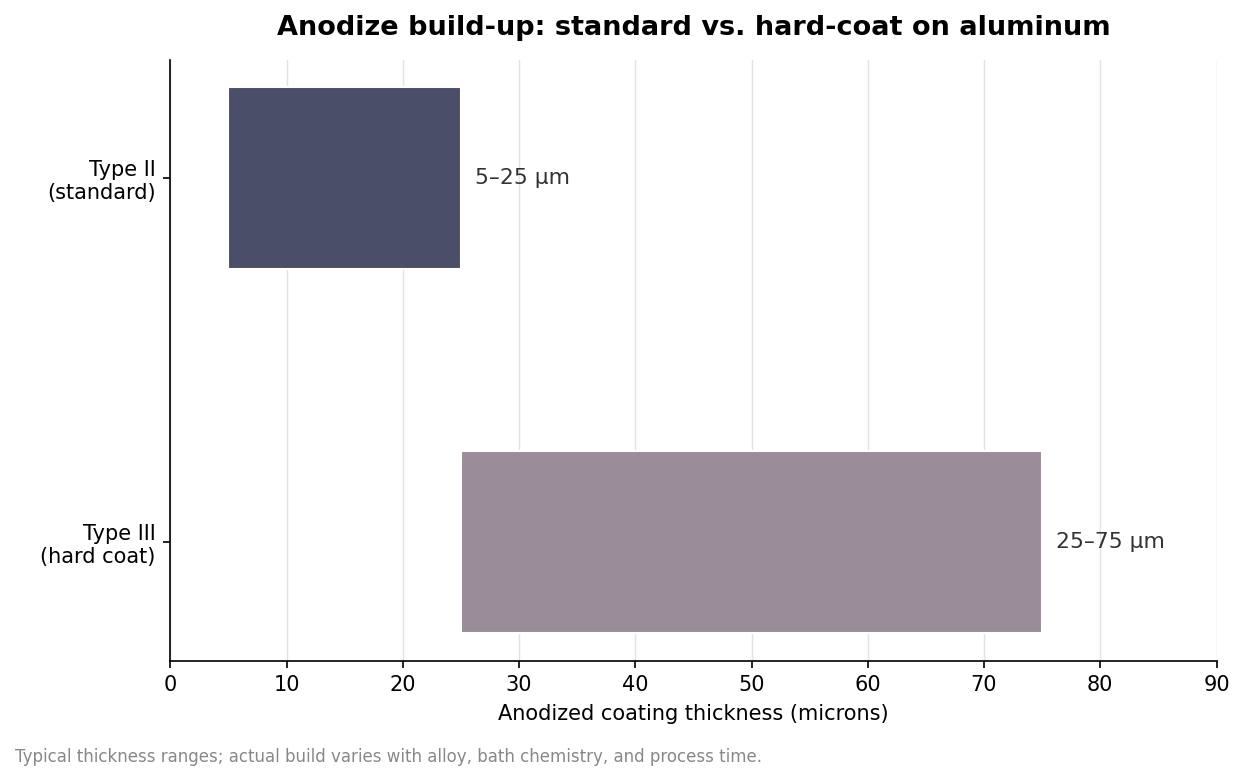
    Horizontal range bars comparing anodized coating thickness: Type II standard at 5 to 25 microns versus Type III hard coat at 25 to 75 microns
    Hard-coat (Type III) anodize builds a far thicker oxide layer than standard Type II.

    Laser engraving: permanent, but one color

    Laser engraving is the most durable way to mark metal because it removes material instead of adding ink. On an anodized body, the beam ablates the colored oxide layer and exposes the lighter aluminum beneath, so on a black light your logo reads as a bright silver mark with strong natural contrast. That permanence is the selling point: an engraved logo will not scratch, fade, or wash off for the life of the light, which makes it the right call for premium gifts and anything that lives on a keychain or in a toolbox. The tradeoffs are real, though. Engraving is monochrome by nature, so you cannot reproduce a multi-color brand mark, and the finished color is whatever the base metal gives you rather than your Pantone. It also works only on metal, ruling out plastic bodies entirely. When your identity is a single wordmark or a clean logo and you want it to last, engraving is hard to beat.

    Pad and screen printing: color on a curved body

    When you need brand color, you need ink. Pad printing uses a soft silicone pad to pick up the image from an etched plate and stamp it onto the curved barrel of the light, which is why it handles three-dimensional shapes that flat processes cannot. Each color is a separate stamp, with roughly one to four colors practical before cost and registration become awkward, and it is the most economical imprint for short and medium runs. Cylindrical screen printing rolls the body against a screen to lay down a durable single-color image and suits larger volumes. Both are ink-on-surface methods, so they can be Pantone-matched to your exact brand color, and both are the only realistic way to decorate a plastic body. The catch is durability: ink sits on top of the finish and will wear with heavy handling over time, where an engraving would not. For color-critical branding, giveaways in brand colors, or plastic housings, printing is the answer; just specify a protective clear coat if the lights will see rough use.

    How hard the finish needs to be

    Anodizing comes in two grades that matter here. Type II, the standard, builds a coating roughly 5 to 25 microns thick with a surface hardness around 200 to 300 on the Vickers scale, and it accepts the full color spectrum, from red and blue to gold and black. Type III, or hard-coat anodize, grows a much thicker 25-to-75-micron layer that reaches 400 to 600 Vickers, several times harder than mild steel, and shrugs off abrasion and salt exposure far longer, with salt-spray resistance jumping from a few hundred hours to well over two thousand. That toughness costs two to three times as much to apply, and its dense structure only takes dark dyes, so hard-coat bodies come in bronze, gray, and black rather than bright colors. For a light that lives in a drawer, standard Type II in your brand color is plenty; for tactical, marine, or field-service lights that get dropped and scraped, hard-coat earns its premium.
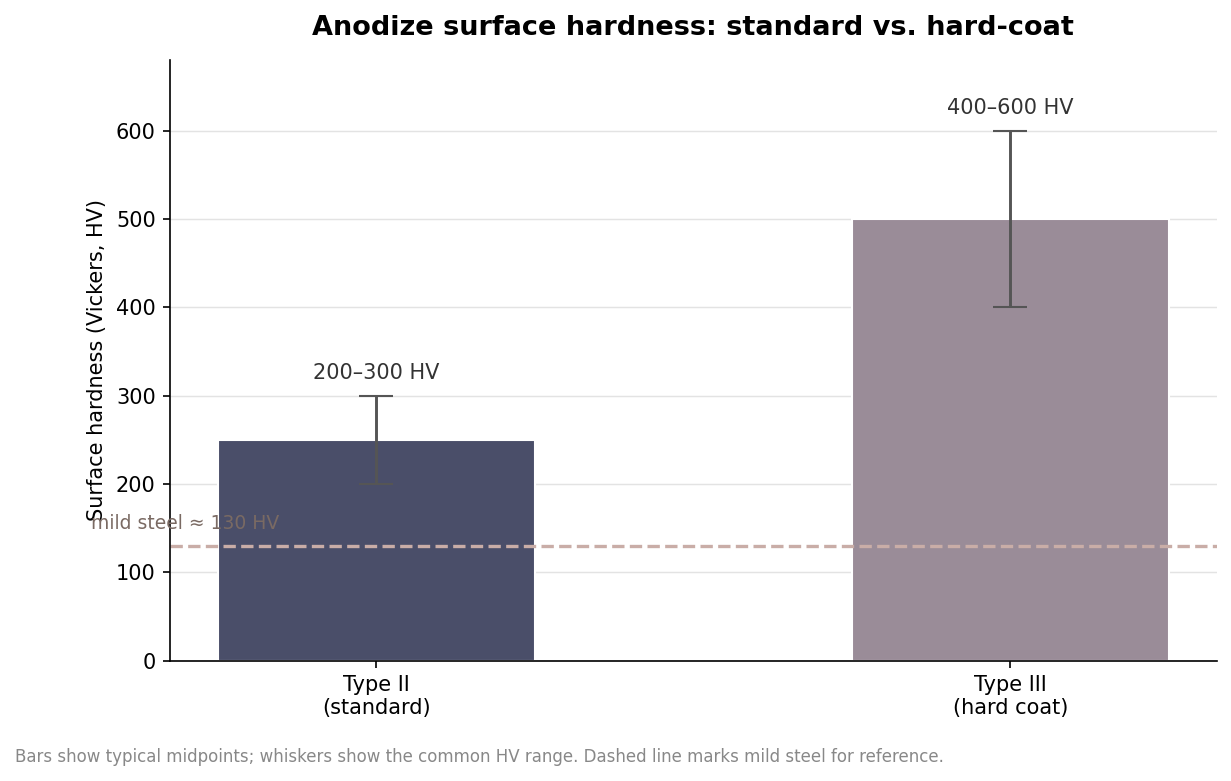
    Bar chart with error bars comparing anodize surface hardness in Vickers: Type II around 200 to 300 HV and Type III around 400 to 600 HV, with a reference line at 130 for mild steel
    Hard-coat anodize reaches several times the surface hardness of standard anodize and of mild steel.

    Putting the combination together

    The choices stack into a few clean recipes. For a premium corporate gift, specify a 6061 aluminum body in a Type II color that matches your brand, then laser engrave a single-color logo for a mark that will still look sharp years later. For a rugged or tactical light, choose black hard-coat anodize and engrave, since the finish and the decoration are both built to survive abuse. For a high-volume giveaway where budget rules, an anodized aluminum or ABS body with a one-color pad print in your exact brand color keeps the per-unit cost down while still carrying the logo. Whatever you pick, confirm the practical details before you approve a sample: the usable imprint area on a narrow barrel is small, so a compact horizontal logo reads better than a tall stacked one; check that any water rating such as IPX4 for splashes or IPX7 for brief submersion matches how the light will be used; and expect custom decoration to start in the low hundreds of units. Treat the figures here as indicative ranges and let a physical sample in your own hands settle the final call.
  • How a Torch Honestly Claims Twelve Hours and Is Useless for Eleven

    A runtime figure is not wrong. It is measured to a convention that means something quite different from what a buyer assumes.

    The convention

    ANSI FL1 quotes runtime until output falls to ten percent of initial.

    A torch at nine percent of its headline brightness is still inside its stated runtime.

    Regulated versus direct drive

    A regulated driver holds output roughly flat, then drops off at the end.

    Direct drive starts at the headline and declines from the first minute.

    Heat does the rest

    A small aluminium head cannot shed much power, so high modes step down thermally.

    That is correct engineering, and it is why the first thirty seconds are not typical.

    So ask a different question

    Not how long it runs, but how long it holds a stated output.

    That single change of question tells you more than any lumen figure on the box.

  • Lumens Are the Wrong Number

    Lumens have become the way torches are sold, which is unfortunate, because they describe the one property most buyers do not need to know.

    What a lumen counts

    Total light emitted, in every direction, added together.

    A bare bulb and a searchlight can publish the same figure.

    What candela counts

    Intensity in the direction you are actually pointing.

    That is what reaches a fence, a pole top or a boat, and it is what throw means.

    Why the two diverge

    A deep smooth reflector and a small bright emitter collimate light into a column.

    A wide shallow reflector spreads it. Same lumens, fivefold difference in distance.

    What to ask for

    Candela and beam distance for anything at range.

    Beam evenness and CRI for anything at arm’s length. Lumens third, if at all.

  • The Complete Buyer’s Guide to Custom Flashlights

    Torches are compared on lumens and price. Neither tells you where the light goes or whether it stays that bright.

    Throw or flood?

    Distance is candela, not lumens. Ask for beam distance as a stated figure.

    Close work wants an even wash and high CRI. They are opposite optics.

    Is the driver regulated?

    Regulated holds output roughly flat. Direct drive falls away from the first minute.

    Runtime is quoted down to a tenth of initial output, so ask at what level.

    How is it marked?

    Engraved through the anodising, or printed on top and gone within a year.

    Ask for the anodising type too: hard-anodised resists abrasion far better.

    Which cell?

    One your stores actually hold, or a replaceable rechargeable.

    Sealed rechargeables become waste the day they stop holding charge.

    And check the switch

    A proud tail switch in a pocket of keys means a flat torch when you need it.

  • How to Read Flashlight Specs: The ANSI FL1 Standard, Decoded

    How to Read Flashlight Specs: The ANSI FL1 Standard, Decoded

    Two flashlights can both print “1,000 lumens” on the package and perform nothing alike in the field. One might hold that output for three minutes and then sag; the other might throw its beam twice as far from the same lumen count. The numbers only mean something when they are measured the same way, which is exactly the problem a testing standard solves. If you are buying custom flashlights for a crew, a giveaway, or resale, learning to read the spec sheet the way the standard defines it keeps you from paying for a headline figure that does not survive contact with reality.

    Why flashlight specs need a standard

    The reference that brings order to the category is the ANSI/PLATO FL1 standard. It defines how each performance number is measured — the test conditions, the timing, the pass criteria — so that one brand’s lumens can be compared with another’s. A spec sheet that cites FL1 is telling you the figures were gathered under a common protocol rather than a marketing department’s best-case guess. The 2025 revision went further and now asks high-output lights to disclose both their initial and their sustained output, closing a gap that let a light claim a brightness it could hold for only a moment.

    Lumens versus candela: output is not throw

    Lumens measure how much light a torch produces in total; candela measure how intensely it concentrates that light at the center of the beam. Under FL1, light output is read in an integrating sphere 30 to 120 seconds after switch-on, capturing total luminous flux. Peak beam intensity, in candela, captures the brightest point of the beam instead. The distinction is practical: a floody work light can pour out high lumens yet throw a short, wide pool, while a tightly focused thrower with modest lumens can reach much farther because its candela figure is high. Decide first whether your users need to light a nearby workspace or spot something far off, then read the metric that matches.

    Beam distance and the square-root trap

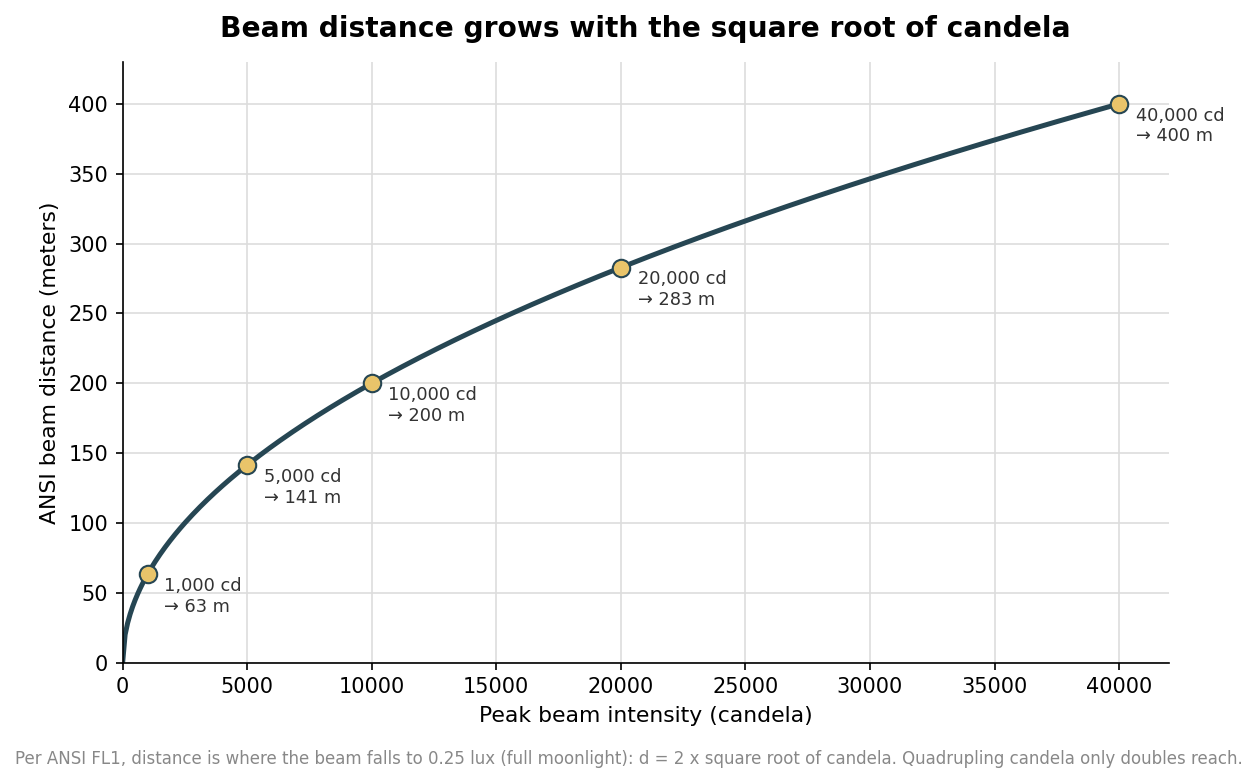
    FL1 defines beam distance as the range at which the beam dims to 0.25 lux — about the light of a full moon — and it is calculated from the candela figure rather than measured with a tape. That calculation hides a trap for buyers. Because illumination falls off with the square of distance, beam distance grows only with the square root of candela: to throw twice as far, a light needs roughly four times the peak intensity. The chart below shows how quickly the returns flatten, which is why a jump from 10,000 to 20,000 candela buys far less extra reach than the raw numbers suggest.

    Line chart showing ANSI beam distance rising with the square root of candela, with example points from 1,000 to 40,000 candela
    Beam distance scales with the square root of candela, so throw gains flatten quickly.

    The takeaway for a purchase is to treat huge candela claims with perspective. Past a point, spending the specification on more throw yields diminishing distance, and that budget is often better put toward runtime, durability, or a better imprint.

    Runtime, impact, and water resistance

    Runtime under FL1 is the time from initial output until the light drops to 10 percent of that starting brightness, measured at the highest mode. This is why a well-regulated light that holds a flat output and then steps down can advertise a shorter runtime than a cheaper one that dims gradually from the first minute — the regulated light is more useful for longer even though the number looks smaller. Read runtime together with output, not on its own.

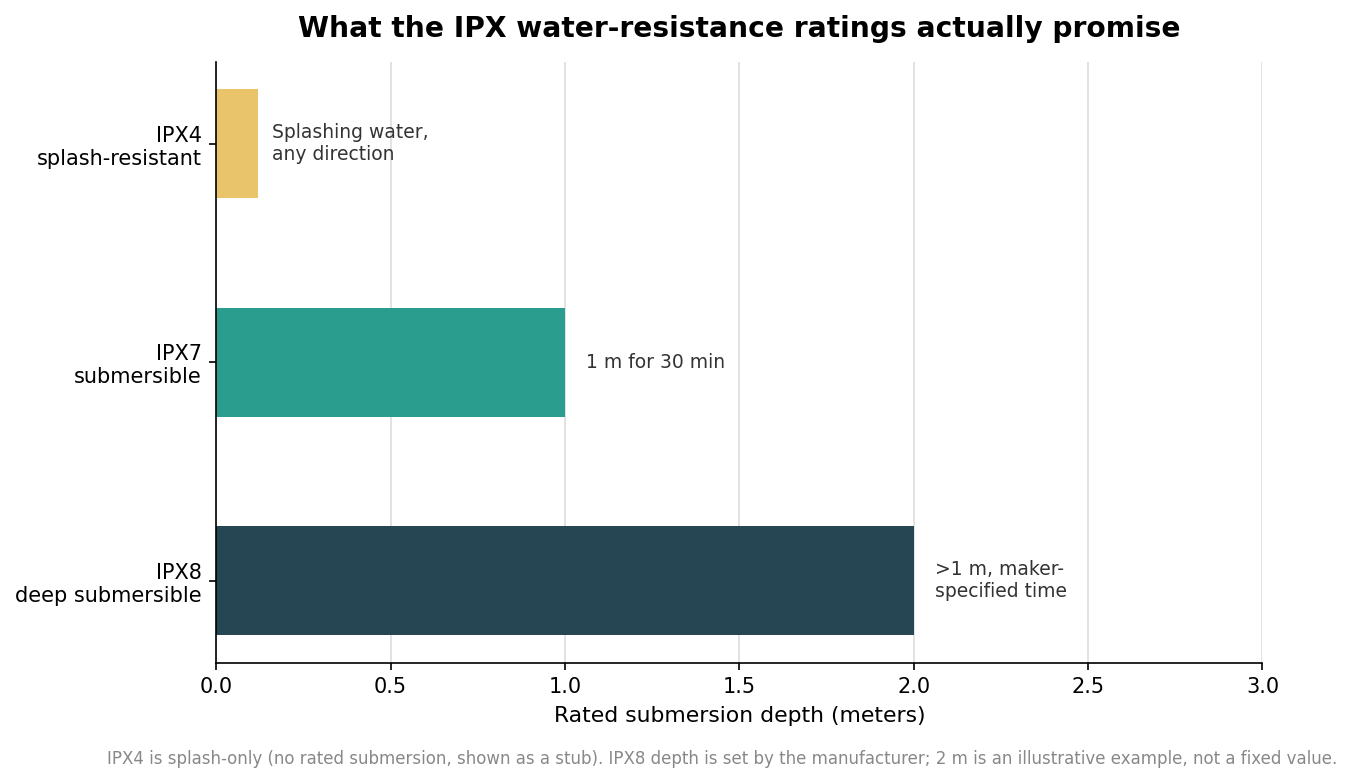
    Impact resistance is a drop test: the rated figure in meters is the height from which the light survives six consecutive drops onto concrete without failing. Water resistance uses the familiar IPX scale, and the three levels you will see mean specific things. IPX4 covers splashing water from any direction but nothing submerged; IPX7 means the light survives submersion in one meter of water for 30 minutes; and IPX8 means it withstands deeper submersion for a duration the manufacturer specifies. The chart below lays out what each level actually promises so a spec does not oversell.

    Horizontal bar chart comparing IPX4, IPX7, and IPX8 water-resistance ratings by rated submersion depth
    What each IPX water-resistance rating actually promises, from splash-only to deep submersion.

    What actually matters for a branded order

    Once the performance numbers make sense, a custom order adds a second set of decisions the spec sheet does not cover. The imprint method is the first. Laser engraving cuts the logo into anodized aluminum for a permanent, premium mark, but it shows only the underlying metal color rather than your brand palette; pad printing lays down a full-color logo on aluminum or plastic, at the cost of some durability as the print wears with handling. Choose engraving for tools people will keep and knock around, and pad printing when brand color is non-negotiable.

    Material and power round out the choice. An anodized aluminum body feels substantial, sheds heat better, and takes an engraving cleanly, while an ABS plastic body is lighter and cheaper and suits high-volume giveaways. On power, disposable AAA or AA cells keep the unit price and shipping simple, whereas a built-in rechargeable lithium cell with USB-C is more convenient for the end user but carries battery-shipping considerations worth confirming before a large order. Promotional flashlights commonly land in a modest output range — very roughly 25 to 300 lumens — which is plenty for everyday carry; treat that as an indicative band rather than a rule, and match it to how the light will actually be used. As with any custom run, request a decorated sample and confirm the FL1 figures, imprint, and battery type in writing before you commit the full quantity.

  • Hello world!

    Welcome to WordPress. This is your first post. Edit or delete it, then start writing!